Monday, March 31, 2014

1978 HONDA CB750 SUPERSPORT PROJECT UPDATE 3/29

1978 HONDA CB750 SUPERSPORT PROJECT UPDATE 3/29

On Saturday, March 29th I went to work on a good friends new bike he purchased earlier this month. It is a 78' Honda CB750 Super Sport in really great condition and he just wants to get it up and running because it's been sitting unused for the past 30 years.  It is going to need all of the basic stuff, like oil change, new spark plugs, new drive chain, new tires, carb clean and rebuild, flushed brake lines, new battery, etc.  This probably won't be a long project because there isn't anything to difficult that needs done (from what I can see).  For the most part we will just be installing the parts we ordered as they come in.  It's just as exciting working on someone else's bike as it is one of my own.


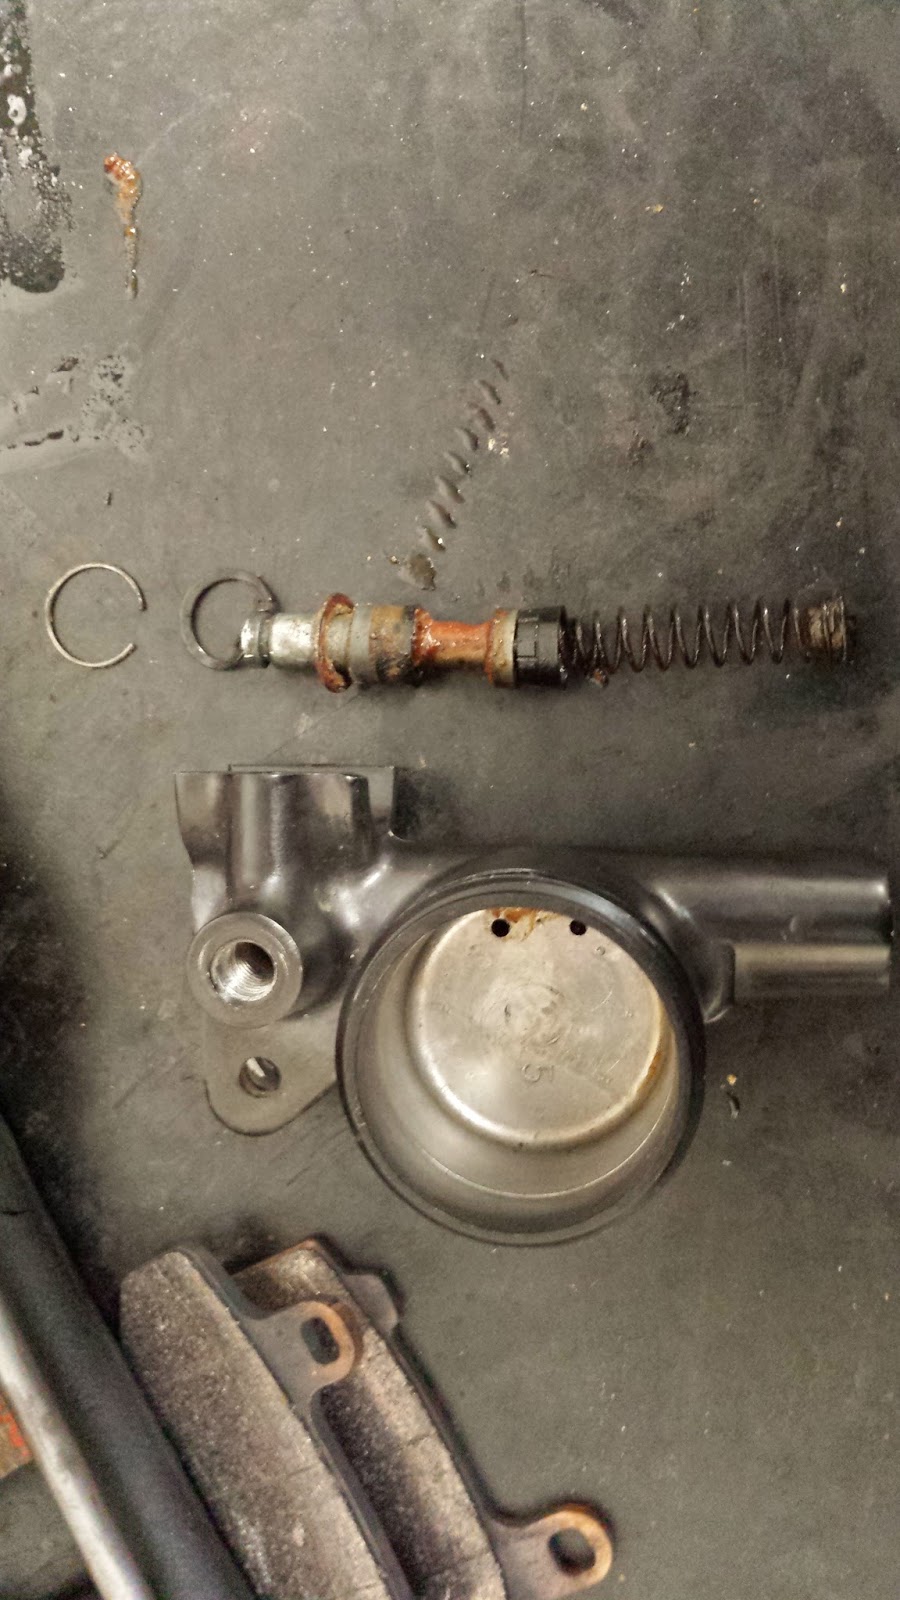
I got quite a bit done on it for one day.  I drained the oil completely and also removed the front oil filter so that can be replaced as well.  We drained all the old gasoline out of the gas tank.  I removed the old push/pull throttle cables along with the throttle tube because they were completely seized.  I removed the master cylinder to clean out all the debris that had built up in there and checked the brake lines to see if they were getting brake fluid down to the calipers, and they were.  The calipers are going to have to be removed and cleaned though because it looked like they were stiff.  


Next week, I will most likely begin with pulling off the carbs and helping my friend order any other parts we are going to be in need of.  The throttle connection to the carbs is seized as well, but I'm hoping that is something that can be fixed rather than having to buy new parts for.  Otherwise we're off to a great start!  Can't wait to hear this engine fired up for the first time.


Thursday, March 27, 2014

1981 HONDA CB650 CAFE RACER UPDATES 3/27

1981 HONDA CB650 CAFE RACER UPDATES 3/27

Today I stopped by the painters to see how Bruce was coming along with the gas tank, seat pan and side covers.  He'd gotten quite a bit done already which was great but he had a few questions he needed me to clarify for him before he proceeded.  The side covers still had the two holes in them from where the badges attached and he wasn't sure whether I wanted to keep those or have them patched up.  I told him to go ahead and patch them up since I wasn't planning on putting those old cruddy 650 badges back on.  These covers should look pretty sweet afterwards!  The side covers are going to be a gloss black color but the tank and the seat pan will have a different color.  I'm not going to share what that is yet though.  Not until it's all said and done.


I also made the executive decision to have the brackets for the tank badges covered up since I won't be putting those back on either.  They would lower the quality of the look once the paint job is looking fresh.  I was going to use some clear coat decals like I did with the last build but I opted out.  Part of me wishes I had some kind of small detail on the tank, but the other part of me wants to try something different this time around.  Since I'm planning on selling this build once it's done, I don't want to get too deep into it financially because that's when I end up losing money or can't sell it.  The bike market is not great right now but I'm hoping it'll pick up as we get closer to summertime.


This bike will definitely be able to stand the true test of time after I'm done with it.  That's it for now, check back this weekend for more updates!


Wednesday, March 26, 2014

GEARING UP: A GUIDE TO THE BASICS OF MOTORCYCLE SAFETY GEAR

GEARING UP: A GUIDE TO THE BASICS OF MOTORCYCLE SAFETY GEAR

If you are a new rider and you want a good overview of equipment you will need and the reasons behind having them, the link below provides some good insight.  Even if you are a seasoned rider, this is a great read and reminder of how to protect yourself out there on the road.  Give it a look!


Thanks for sharing this with me Ben Graham!

Monday, March 24, 2014

1973 HONDA CB500K - RESTORATION UPDATE

1973 HONDA CB500K - RESTORATION UPDATE


This past Saturday, March 22nd I got some work done on the Green CB500 Four.  The Wednesday prior I had ordered a few parts from the Honda Dealership here in Huntington Beach.  They arrived on Friday so I was excited to get going on it once the weekend hit.  My main objective was to get the new clutch cable swapped out for the old one, but I ended up getting a lot more accomplished.  Below is a recap of what was accomplished:


As soon as I got the clutch cover taken off I knew I was going to have a good deal of cleaning to do.  It was a greasy mess.  I've never seen it cached on that thick before but I figure it's been over a decade since someone took it off to clean so it made sense.  I got the clutch cable removed and began scraping out all that thick black grease.  I also cleaned around the inside of the engine near the sprocket and chain.  That's where the majority of the mess was.  There was quite a lot of buildup on the frame and below on the exhaust pipes just below the area where they run under the engine.  I had some good cleaner to use that made it easy to remove but all the little grooves around the gear box had to be picked at with a screwdriver to get the packed in grease out.  

Then, I finally got to get started cleaning the cover itself.  This was pretty easy to clean out for the most part.  I hopefully won't have to do this again for a while.  Below is a "before & after" shot of the clutch cover.


Much better now...


At some point I plan on getting all the engine covers taken in to be polished but first I need to finish my other Cafe Racer project.  It'll give me some time to line up new bolts and gaskets.  I'm looking forward to having both CB500's looking fine.


 After all the parts were cleaned I attached the new clutch cable and re-installed the cover back onto the bike.  Then I just had to route the cable up to the lever on the handlebars so I could get it attached to the perch and adjust the settings.  In case you've never done this before, you will need to remove the gas tank to get the clutch cable off and the new one back on.


I put a new adjuster nut and washer on there as you can see because the old one was pretty rusty and looked bad.  It's such a small change but can make a huge difference.  Once the clutch adjustments were good to go and it was back in working order, I moved the ignition switch back down to it's original location there by the left front side of the engine.  You can see where my key chain is hanging in the picture below.  The previous owner had moved it up to the handlebar area and it just looked odd.  Now, its where it should be and my key chain won't rub on the gas tank anymore.


The last thing I accomplished was cleaning the triple clamp.  When I bought the bike the paint on the triple clamp was coming off and looking pretty raggedy.  My plan is to have this piece re-powdercoated black but as I mentioned above, I need to put most of my money into the cafe build first.  Then I can do what needs to be done with this.  All I did was take a steel brush to it after I removed it from the bike in order to prep it for that future work.  It looks better all blacked out but it will at least look good for now with a nice clean finish.


All in all, I'm proud of what I got done for the day!  Unfortunately, my back is incredibly soar because I did not have a lift to put this on and was bent down the whole day, but Fuck it!  It was worth it.

Saturday, March 22, 2014

1981 HONDA CB650C CAFE RACER UPDATE

1981 HONDA CB650C CAFE RACER UPDATE

Just a few updates this week on the CB650 Cafe Racer project.  It feels like this project is moving so slowly but slow and steady wins the race.  I'm at the point where the end of the project is in sight and all I want to do is ride it!  I remember being in this mindset not so long ago with my CL360 build.  All in time I suppose.  
A little over a week ago I ordered a MAC 4-into-1 exhaust system that arrived this past Wednesday.  The exhaust that was on there took up too much space, it added to the overall weight and didn't really fit with the look I was going for.  The old pipes came off without a hitch and I'm really happy with how the new one looks!  It has a nice "race bike" sound quality to it.  This ride will definitely have a lot more "get-up and go" than my other Honda's.


It's hard to tell from these pictures but I ended up deicing to take the air box out and go with pod air filters instead.  As you can see they aren't on the bike currently.  The filters have to be special ordered because the standard size is too long/wide and rubs against the frame and each other.  There are some 54mm pancake free flow air filters from SCOOTER ASSASSINS that I am ordering from EBAY but won't have them for about 2 weeks since they'll be coming from Australia.  See Picture below:


Long story short, when I ordered the new exhaust pipes I didn't realize that the carbs would have to have different jets installed to run properly.  If I had known I was going to be using a 4-into-1 exhaust system I would've just had the proper jets put on the first time the carbs were taken off to be cleaned and rebuilt.  I was originally going to keep the air box but since we had to take the carbs off once again to access them, I figured screw the air box, let's make life easier on myself for all future changes/cleanings of the carbs.  I still need to get inside the area where the air box was and clean it up because there is a lot of dirt, grease and build-up in there that I want gone.


The gas tank, seat pan and side covers have been dropped off at the painters but I won't be getting those back for about 4 weeks.  He is pretty backed up right now.  However, he does a really great job so that's why I am willing to wait.  I am hoping the color turns out just like I imagine it.  I'm not going to say just yet which color I decided to go with but I think it will finish the project off nicely.  

That's all I got for now!

Saturday, March 15, 2014

81' CB650C & 72' CB500F UPDATES

81' CB650C & 72' CB500F UPDATES

 The first half of this post pertains to the progress of my 2nd Cafe Racer build with the CB650 Custom.  The second half are for the 72' CB500 Four.  Things are moving along slowly but surely.  My minimal cash flow is dictating the speed of this project unfortunately.  I don't mind taking things slow because it gives me time to make good choices and avoid mistakes which can be costly.  

Towards the end of last week I had a buddy of mine weld on some tabs for the new rear turn signals.  I don't have a welder or knowledge of how to do it so I had to outsource this bit.  As you can see they match the front ones from an earlier post I did.  Unfortunately, before trying to install them today I realized they were welded too closely to the rear shocks and wouldn't allow the bullet turn signals to fit.  It was an easy fix to pull them off, grind down the rough edges and re-weld them.  After a little black spray enamel I was in business.  They look great!  The following two pictures should give you a pretty good idea what they look like.  The wiring needs to be done for these and the rear taillight yet.


Say "goodbye" to these exhaust pipes!  More updates on that next week.


As far as my second CB500 Four project go, I made a little more headway on that this week.  The master cylinder was removed and disassembled.  I've never rebuilt a master cylinder before but I figured this would be the perfect opportunity.  The one I took off the bike was pretty dirty as you can see.  I cleaned all these parts and ordered a rebuild kit on EBAY for around $25 dollars.  That's what is in the plastic packaging on the left.  Due to the fact that I didn't have snap ring pliers I had to make a trip out to Home Depot to get some because there is a snap ring inside the cylinder shaft.


Once you remove everything out of the shaft, this is what the insides look like in the order they are removed.  Pretty gross and dirty.  The new stuff is so fresh and so clean!  After some vigorous cleaning of the inside I was able to get started installing the new parts.


 Below is the final product!  I'm really proud of myself for accomplishing this on my own.  I'll be much more confident in doing this again in future projects and it will be easier now that I have all the tools I need too.  I already installed it back on the bike, only to find that the lower front brake lines are going to have to be replaced as well.  Ugh.  Well, if it's not one thing it's another with these restorations.  I'm going to check out 4into1.com for what the cost of that would be.  I just bought one for my other CB500 but it was through EBAY.  There may not be another used, working one up there yet.


I also received the Yuasa battery I ordered like two weeks ago.  When I ordered it I guess I didn't take into account that they don't ship with battery acid in them, so you can imagine my surprise when I received it and started reading through the directions about installation.  I was naive in thinking I'd just pop it in and attach the positive and negative lines and be ready to go.   Nope.  Luckily, Huntington Beach Honda fills batteries with acid for free.  Loving that!  After they filled it up for me, I plugged it into the charger for about 6-7 hours per the directions.  After a long await, I installed it and eureka, I had lights!!  The right turn signals were sticking a little and the taillight needs to be examined as it wasn't attached when I bought the bike and didn't light up with the rest of the bike.  It could be a burned out bulb or incorrect installation on my part.  I'll figure it out.  


That is all for now!  Thanks for reading!

Sunday, March 9, 2014

1981 HONDA CB650 CAFE RACER - PROJECT UPDATE

1981 HONDA CB650 CAFE RACER - PROJECT UPDATE

Overall, this was a really productive week on the motorbike front.  I had two different bikes at the shop,  so in this post I'll only be covering the progress on the Honda CB650.  The picture below represents where we left off last week with the exception of one tiny difference; the bracket for the cafe seat.  I wanted to show a close up picture of that so you can see how it stays bolted down.  


Two tabs were drilled in the frame for the bracket to be screwed down into.  The two screws in the middle go through the top of the seat and into the tab below to hold it snug.  It's pretty self explanatory but I guess the key here is to make sure it's level and the fiberglass seat pan should be cut at the neck to fit the contour of the gas tank cleanly.  When the seat doesn't fold over the section of the gas tank that bolts down it looks disconnected.


As you can see the new seat was picked up from the upholsterer and this time I decided to go with a black on black diamond stitch.  I wasn't ecstatic about having to use buttons to hold the seat on, but it actually turned out pretty rad.  The only way I would've been able to get away with bolting on the seat without using the snaps would be to relocate the battery/box and wiring so that I could reach a hand underneath the seat to screw in the bolts.  That would cost another $400 dollars at minimum so this is the less expensive route.  It works.

One other thing I discovered after getting the seat back on was that the side covers no longer work for the look I'm going for.  The old seat used to dip down and meet the side covers nicely, so I may have to cut some aluminum panels out and paint them black to use instead.  There's no way I can justify using the stock ones at this point.


I'm still deciding what I want to do about the taillight and license plate mount.  I originally liked the idea of mounting the rear taillight on the backside of the seat pan, but I'm thinking that may not be the route I end up taking, and I'll tell you why.  If I decide to sell this thing and someone doesn't like the seat pan and decides they want to do a nice flat job, they would not only have to purchase a new seat but also a taillight and some wiring.  The solution in my head is to do a side mount license plate/taillight because it can stay where it's at no matter what seat is on.  However, I can't do a license plate/taillight mount while my current exhaust pipes are there.  It won't fit.  As a result, I'm thinking the best thing to do would be pick up a new mac 4-into-1 exhaust system and put the mount on the opposite side of where the exhaust pipe exits.  That's my plan and I'm sticking to it…I think.


 The last changes made this week were the painting of my front and rear wheels along with the front forks.  The tires were replaced before the paining was done in order to avoid scratching them with tire irons post paint job.   These are the Kenda tires I purchased through www.motorcycle-superstore.com, I'm pretty sure I posted a picture of them in a previous post.  These look ten times better all blacked out!  Right now I'm just trying my best to visualize the final product and work towards that while working through any hiccups along the way.   


That's it for now!  Thanks for reading and check back soon for more updates on this project.


Sunday, March 2, 2014

1971 Honda CB500 Four, Part 1 - Removing the Carburetors

Join me as I remove the carbs from this original 1971 Honda CB500 Four.  Time to get this baby running and this is Step 1 of what will probably be at least 10 videos.